
What’s an ermi test? Do i need one? Is an inspection or an ermi better? Understanding the Basics, Benefits, and Limitations

What Is ERMI?
The ERMI uses MSQPCR (Mould-Specific Quantitative Polymerase Chain Reaction) technology to analyse dust samples for mould DNA. It DNA tests your dust for mould basically.
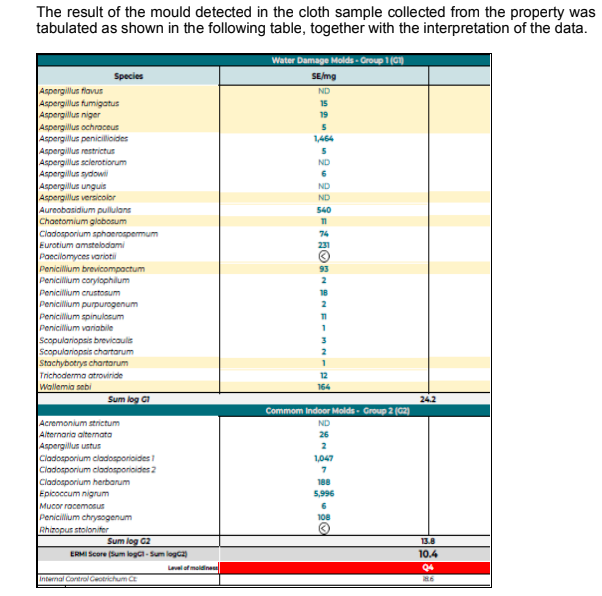
This test quantifies 36 species of mould:
• Group 1: 26 species associated with water-damaged homes.
• Group 2: 10 species commonly found in homes without water damage.
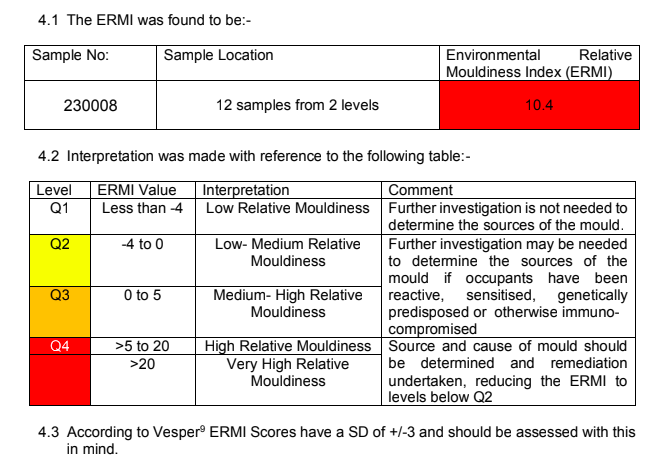
A score is calculated that then gives you a home rating of either low, low-medium, medium-high, high, or very high relative mouldiness. It looks like this:
But setting aside the score for a minute, the types of moulds found and in what proportion is a lot more important than just looking at the score in isolation - as sometimes the algorithm used to calculate the score doesn’t work perfectly. For example, if you get a low score back, but 5 spores of Stachybotrys have been found, that’s a real problem.
How the ERMI Works
To perform an ERMI test, a dust sample is collected—typically using a Swiffer cloth (more common) or a vacuum attachment. The test identifies mould DNA, kind of similar to how COVID-19 PCR tests detect RNA. The ERMI scale ranges from approximately -10 to 20 or higher, divided into quartiles:
• Lowest quartile: Minimal mould burden. (white)
• Fourth quartile: Significant mould burden. (red)
It’s important to note the standard deviation of ±3, which means a score of 5 could actually range from 2 to 8.
Why Dust Samples Matter
House dust contains a mix of particles, including mould spores (dead and alive), fragments, fungal proteins, and byproducts. Dust analysis offers a time-integrated view of mould exposure, complementing air sampling, which captures mould at a single point in time. Ie. it’s looking at what’s been sitting in your dust for this last little while, and air samples are looking at what is in the air right now in this moment.
ERMI testing has been shown to outperform traditional mould inspection methods in detecting hidden mould. In one study, 50% of homes with high ERMI scores were not identified as mouldy through conventional inspections (Vesper et al., 2009). In short, an ERMI test will be much more informative and accurate in determining if there’s a mould issue in your home than a run-of-the-mill inspection with a couple of haphazard air samples. The shortcoming of ERMI is that it doesn’t give you any information about where the mould is and how to fix it, that’s where you need an inspector.
[SIDE NOTE: IF YOU’RE WANTING TO TEST THE CURRENT CONDITIONS AFTER A RECENT WATER DAMAGE EVENT AND IT’S ONLY OCCURRED IN THE LAST FEW WEEKS, THEN ERMI ISN’T THE RIGHT WAY TO GO ABOUT IT AS IT MAY NOT HAVE HAD TIME TO SHOW UP IN THE DUST YET]
What Can We Learn from an ERMI Test?
• Type of Moulds Present: ERMI identifies a broad spectrum of mould, including live, dead, dormant moulds, and fragments, whereas air sampling typically only counts airborne spores.
• Mould Quantities: It provides a breakdown of how much of each mould type is present.
• Detailed Identification: ERMI identifies both genus and species, unlike air and surface samples, which usually identify only the genus.
• Moisture Requirements: We can use the information to determine whether the moulds are types that thrive in high-moisture environments (suggesting leaks) or lower-moisture conditions (pointing to humidity issues).
• Heavy Mould Detection: ERMI is more effective at detecting heavier moulds like Stachybotrys and Chaetomium that quickly settle and may not appear in air samples unless concentrations are extremely high. (Though this is why a good inspector will do surface samples also).
• Wallemia Detection: Unlike air sampling, ERMI detects Wallemia, a mould linked to health effects.
• Screening Tool: If the ERMI results show there’s no mould issue, you might not need further testing or to hire an inspector, saving you time and money.
Limitations of ERMI Testing
• No Source Identification: While it shows the presence and type of mould, it doesn’t indicate where the mould is located.
• Single Data Point: ERMI provides historical dust data, making it (ideally) just one part of a comprehensive assessment. Pairing it with other testing methods gives a fuller picture.
• Interpretation Challenges: Results can be hard to understand without professional help. For example, is three spores of Stachybotrys high or low? What does the presence of Stachybotrys signal?
• US EPA Designation: ERMI is listed as “for research purposes only,” a label introduced to shield the US government from liability after its use in post-hurricane evaluations and military housing complaints.
• Recent Water Damage: ERMI reflects past conditions based on accumulated dust. Mould from very new leaks may not yet show up in settled dust, leading to misleading results.
• Legal Limitations: ERMI results cannot be used as evidence in legal proceedings (e.g., NCAT, VCAT). Additional documentation would be needed.
• Species Scope: ERMI only tests for 36 mould species, whereas thousands exist.
• No Bacteria Included: Bacteria linked to CIRS and poor indoor microbial ecology are not detected unless additional testing is done. If you have a multi-susceptible HLA gene, it’s more important to do the additional tests for bacteria and endotoxins (more on that below).
• Cost Considerations: Testing every room individually with an ERMI would be the best way to use it but is too expensive. A test on each level of a home is ideal, rather than doing multiple levels with one cloth, but is also costly. In Australia, the cost of one test is ~$470 through NSJEnviro.com.au.
Linking source of exposure to ERMI
If you’ve done a urine mycotoxin test (some practitioners love them, some hate them and it usually depends on if they align more with Dr Neil Nathan’s research or Dr Shoemaker’s respectively), then we can link the mycotoxins found with the species of mould found in the ERMI.
The ERMI doesn’t test for mycotoxins, but we know what mould species can produce which mycotoxins. For example, if Trichothecene mycotoxins are found in your urine, and your home has a source of Stachybotrys, then we can infer that those mycotoxins could have come from exposure in the home.
Preparing for an ERMI Test
1. Avoid dusting, or heavy cleaning for at least 1-2 weeks before testing to allow dust to accumulate.
2. Find areas that you think will be good places to test before you start, targeting areas with undisturbed dust.
3. Wear gloves to avoid contamination and document the sample locations.
4. After you’ve tested, you’ll place the cloth into the bag provided, seal it up and ship it back to the lab for analysis. Turn around times usually vary from around 1 week – 2 weeks. Do not place the paper form in the same bag as the cloth.
Best places to test:

If using the Swiffer method you will wipe down dusty surfaces in one direction, don’t wipe back and forth, in the room(s) you want to test.
Try to capture some dust from every area if you’re trying to screen the whole home.
According to Envirobiomics, if you are going to test your ducted air con return vent (don’t do the actual AC or the supply vents where the air blows out), then you should swipe this first.
Capture areas down low too, for heavier moulds, by wiping skirting boards. If possible, try to do some skirting board samples for every area that you’re testing.
The Swiffer has to look dirty in order for the lab to have enough dust to process. You should aim to have the cloth covered with approximately 80% visible dust. You can try folding the cloth up so that you’re working with four areas of the one side of the cloth and making sure you get each quarter very dirty and then flipping it over.
Use the side of the Swiffer that has more texture (holding power).
Good surfaces to dust are the topside of ceiling fans, desktop fans, light fittings, top of cupboards, bookshelves, fridges, painting and poster frames, underneath the fridge, fridge coils and underneath furniture, the top of the TV and shelves that don’t get dusted regularly. You can swipe your HVAC return vent, but don’t sample the HVAC itself or supply vents.
Try to capture from smooth surfaces and not rough surfaces like porous wood as it will pull little bits off the Swiffer.
Take note of where you have swiped as you will need to write it down on the Chain of Custody the laboratory sends out so they know where the samples have come from. Some people like to take photos of where they tested for their own reference or to provide to an inspector later.
Once complete, fold the Swiffer into itself and place it back in the bag. Note that the lab will send (albeit less detailed) instructions for how to perform this test.
Where Not to TestDo not sample bathrooms, laundry rooms or kitchens.
Do not sample directly from a visible mould source (i.e. mould spots on a wall). It will artificially inflate the numbers.
Don’t swipe anything sticky or wet, just dry dust.
Avoid sampling areas that are rusty.
Avoid sampling areas that have visible dust from clay or from drywall dust from construction/repairs/new builds.
No kitchen wiping (other than potentially the top of the fridge). No kitchen countertops or range hoods, as we don’t want anything wet or sticky.
Avoid areas near stoves, heaters or other high heat sources like around a fire.
Don’t wipe floors.
No windowsills or exterior door frames (outdoor spores might be sitting there in higher concentrations.
No garage
Do not swipe the AC unit.
Avoid areas with kitty litter dust (can inhibit the sample)
Regular use of bleach, chlorine products or essential oils can inhibit the sample. If the home has been cleaned with these, wait a few weeks to allow normal dust to accumulate before testing.
Interpreting ERMI Scores
• ERMI > -4: Indicates the need for a mould investigation.
• High ERMI (5–20): Significant/high mould presence.
• Very High ERMI (>20): Requires immediate attention.
• Safe for CIRS: <2, or < -1 for certain health markers (MSH < 35, C4a > 20,000).
But remember to focus on the mould species found rather than the overall score. For instance, finding even small amounts of Stachybotrys suggests a hidden water damage issue.
What Is HERTSMI-2?
The HERTSMI-2 (Health Effects Roster of Type-Specific Formers of Mycotoxins and Inflammagens) is a simplified test included with all ERMI results. It evaluates five key mould species linked to CIRS, providing a score to determine if a space is safe for reentry. It was developed by Dr Shoemaker and his team. It’s useful, and is cheaper, but a full ERMI panel is always preferable as it tests for mould types that the HERTSMI-2 misses.
• <11: Safe for those with CIRS.
• 11–15: Borderline; retest after cleaning.
• >15: Not safe for CIRS patients.Where to buy one?
Through NSJEnvirosciences in Australia (https://nsjenviro.com.au/)
Mycometrics or Envirobiomics are two options in the US
If you have a multi-susceptible HLA (ie you have done a “mould gene” blood test and found out that you’re susceptible to a wider range of biotoxins than just mould), it would be better to do an ERMI plus a test for Actinobacteria and Endotoxins (which are commonly implicated in CIRS). For example, the NextGen sequencing through NSJEnviro or test #7 through Envirobioomics.
ERMI Tests for Post-Remediation Testing
Note that if you are performing post remediation verification (PRV) testing on a remediated area, then it’s best not to rely on ERMI and instead hire an inspector for a PRV. They will moisture test areas that have been structurally dried, do a mix of air and surface samples around the affected areas, confirm small particle cleaning has been effective and so on. This should be done 24-48 hours after the remediation has been completed. There shouldn’t be any dust in those areas at that time for an ERMI test (or else that signifies the area hasn’t been cleaned properly).
Four weeks after remediation, it’s ok to do an ERMI if you want to. You will need to wait ~four weeks after remediation to allow time for mould DNA to settle in the dust. The score should be completely disregarded when used in this instance, and because of the way the algorithm works, a very clean house could have a very high (bad) score.
Final Thoughts
ERMI is a powerful tool, especially for those with health concerns like CIRS, but it’s not often a standalone solution (unless you just want to screen a space for mould like a potential rental and make a decision based on that alone). For the most part, you’ll need to pair an ERMI with an inspection, or just skip to the inspection.Note that mould inspectors can also take a bulk sample, which is cheaper than ERMI (but doesn’t show species, only genus) and the test uses PCR technology too. Fo example, we can take a small pile of dirt from your vacuum cleaner canister (provided it hasn’t been used at any other property) and then sample that.
ERMI provides valuable data, but it’s limitations highlight the importance of a multi-faceted approach when it comes to mould investigation.

Follow me over on Instagram at @mould.wise
for more mould/CIRS tips and info!